Welcome to yuhao's Blog!
在探索的路上留下最美好的記憶-
MPLAB X IDE install note
Microchip MPLAB X IDE install note
MPLAB X IDE 是 microchip 最新一代的開發環境, 根據原廠FAE表示最新版本的MPLAB X IDE 將會開始將原先屬於 Atmel 的 AVR晶片整合進來, 目前搭配XC編譯器可以對PIC系列晶片進行開發
安裝流程
- 下載點: MPLAB X IDE
cd Downloads/
tar xfav MPLABX-v4.20-linux-installer.tar
sudo ./MPLABX-v4.20-linux-installer.sh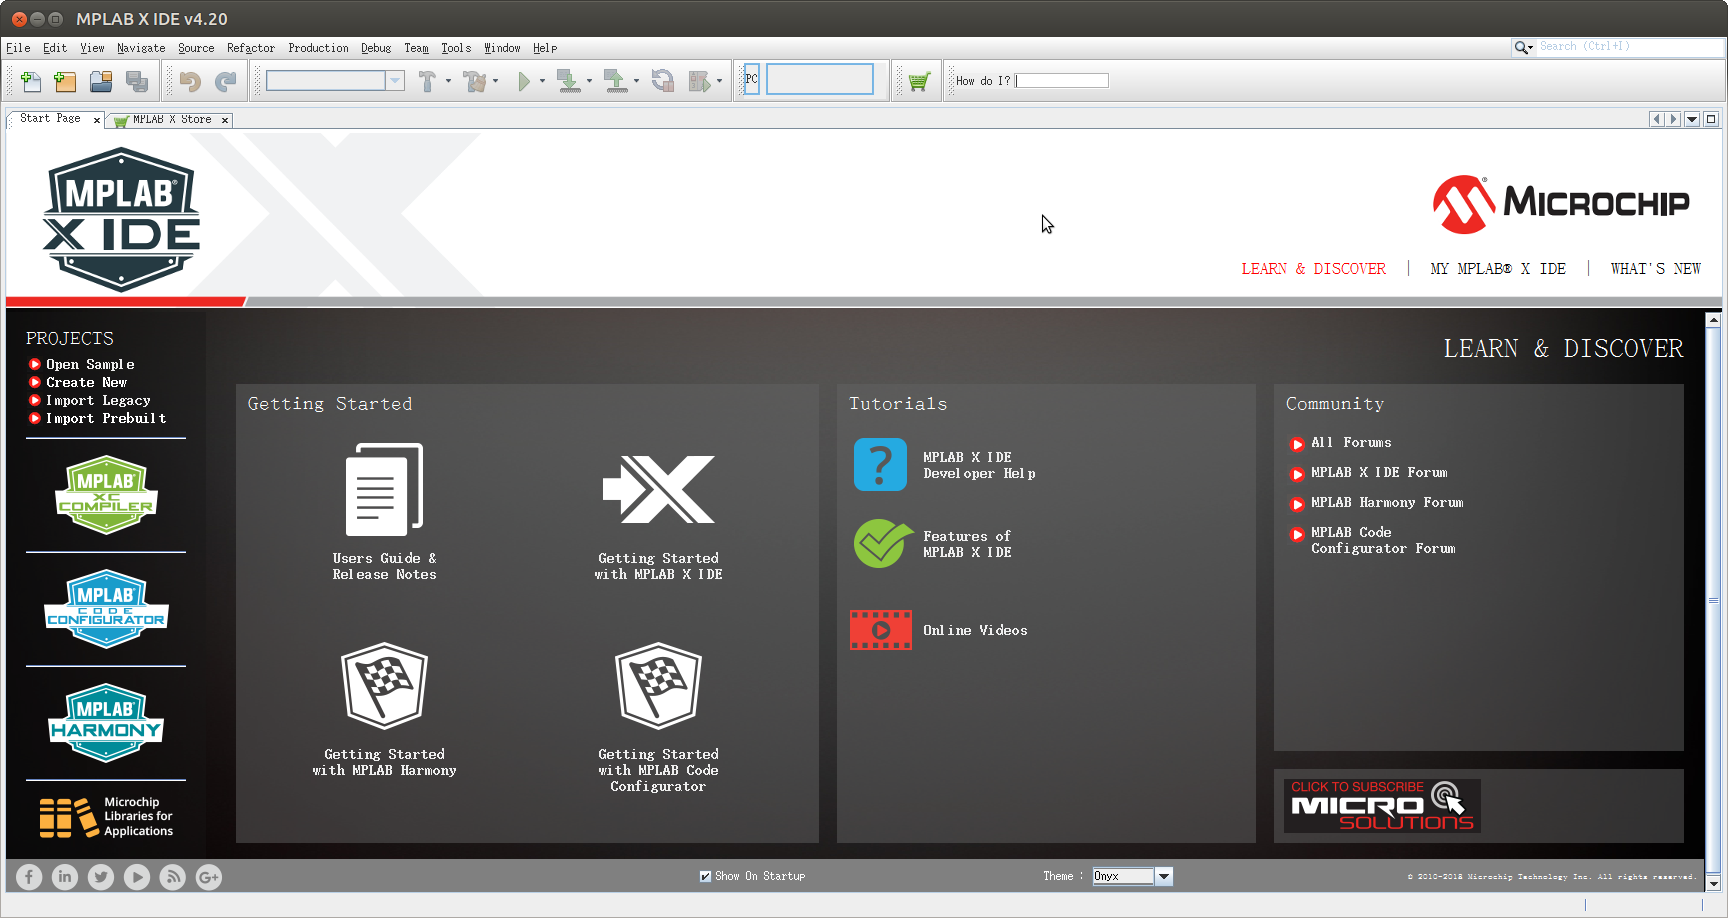
更換風格
MPLAB X IDE 是基於 Netbeans IDE 的依款開發環境, 因此可以直接前往 Netbeans 下載版型來使用
這邊我就用我喜歡的 Darcula 來作筆記
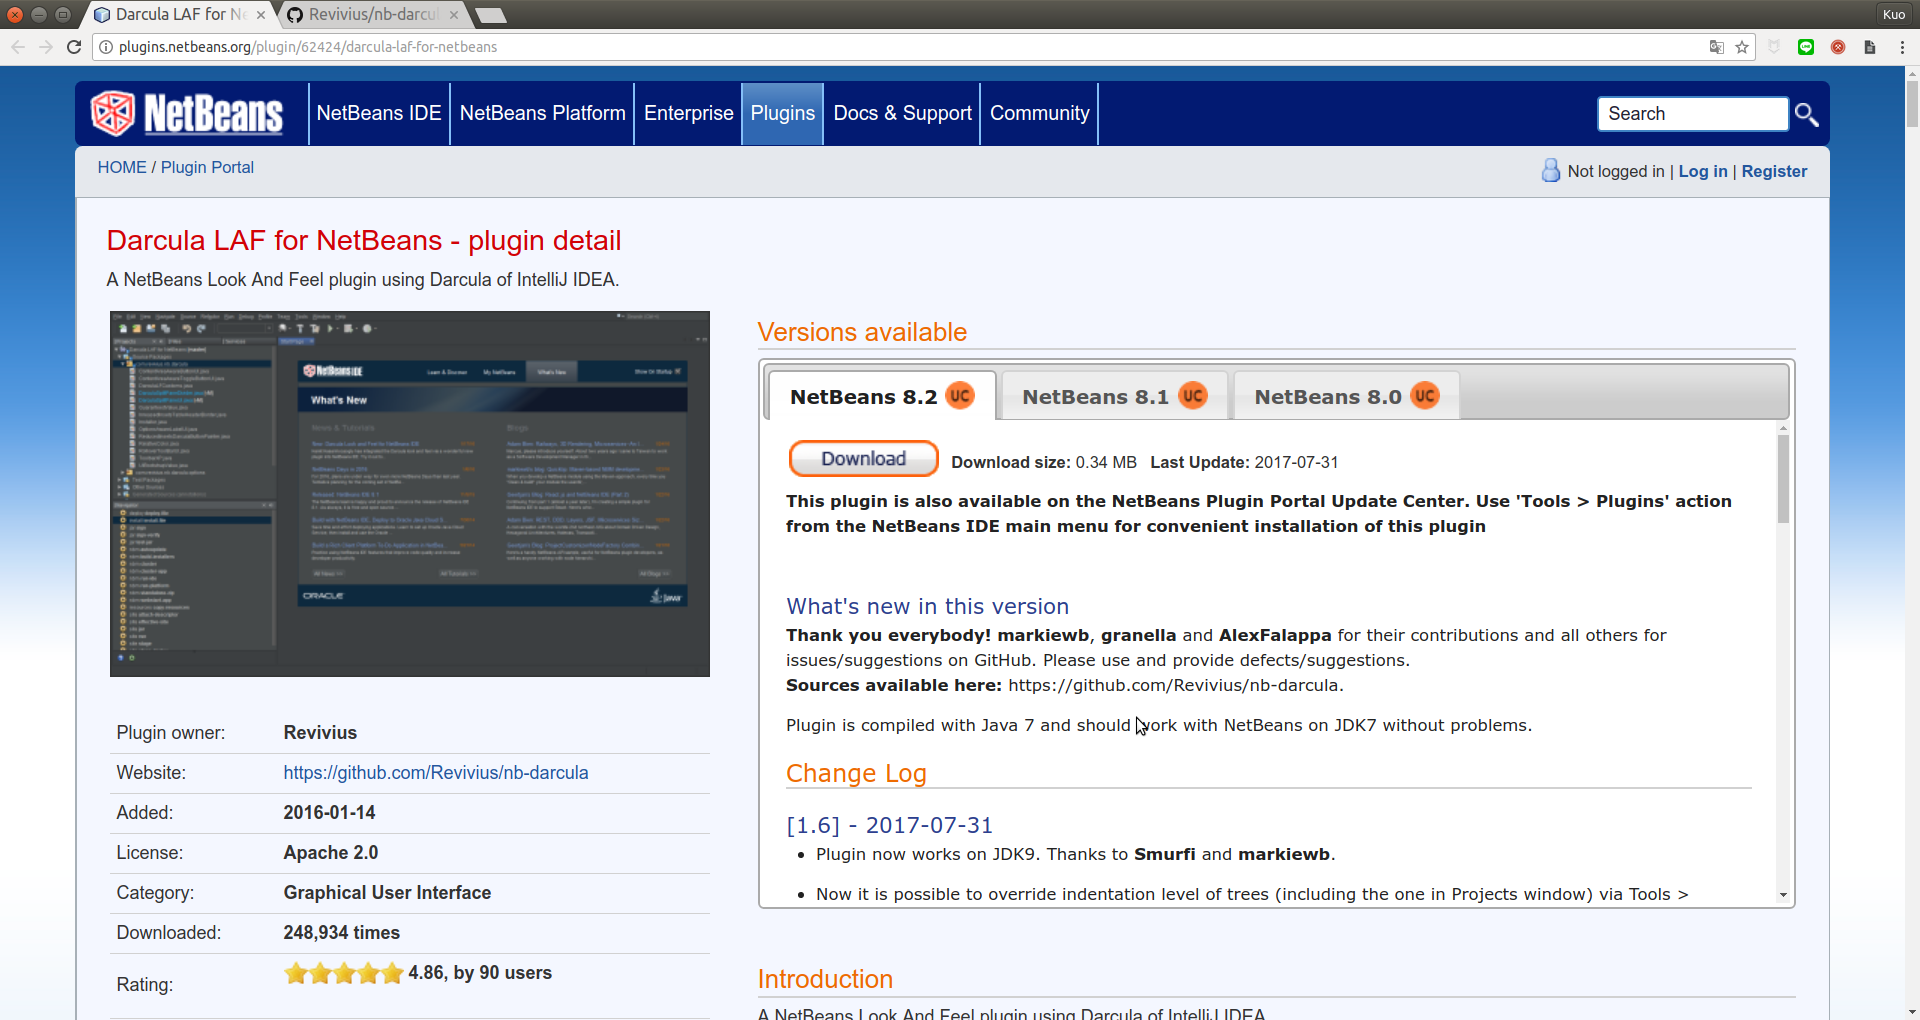
下載後, 版型檔案最常見的有2種
.zip請至Tools/Options/Font & Color進行安裝-
.nbm請至Tools/Plugins/Download進行安裝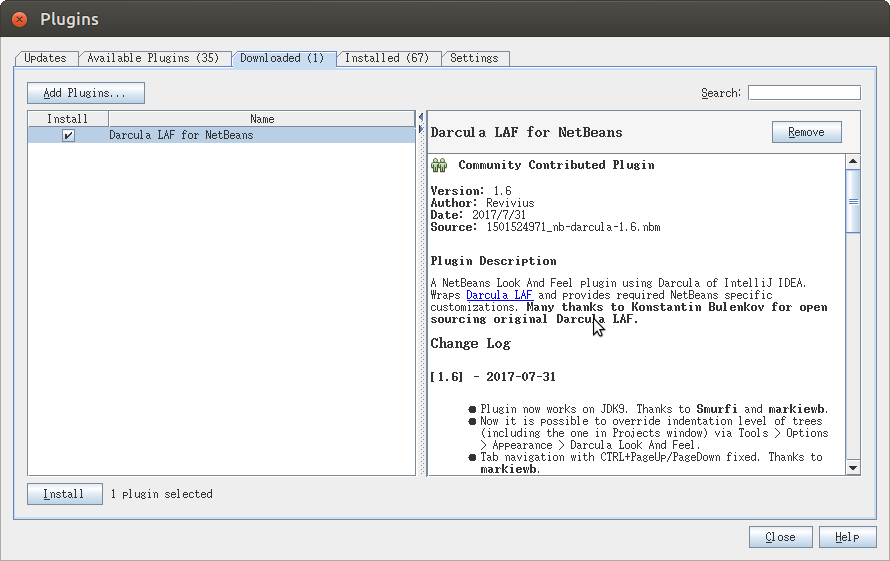
完成後如下

-
PX4 Development build
PX4
PX4是Dronecode Project的一部分,該項目是一個 為無人機(UAV)提供完整端到端平台的共享和協作式開源專案。
本篇筆記僅紀錄環境建立的過程與經歷
環境
- OS: ubuntu mate 16.04 LTS
clone專案
從 GitHub Clone 一份下來。
git clone https://github.com/PX4/Firmware切換到目錄中。
cd Fireware安裝Toolchain
編譯環境
sudo apt-get update
sudo apt-get install genromfs python-jinja2 python-empy python-pip
pip install --upgrade pip
sudo ldconfig
pip install numpy toml
燒錄環境
sudo apt-get install python-serial openocd \
    flex bison libncurses5-dev autoconf texinfo build-essential \
    libftdi-dev libtool zlib1g-dev -y
移除modemmanger
modemmanger會影響燒錄器的功能,目前已知此套件將讓燒錄工作進行時產生錯誤,移除後可以解決,並沒有去追蹤這個套件再哪些方面影響PX4的燒錄工作。
sudo apt-get remove modemmanager調整使用者權限
沒有將使用者加入群組可能會讓部份操作陷入權限不足的問題,如果使用
sudo來處理此問題,可能會使問題擴大。dialout
序列埠的群組是
dialout。sudo usermod -a -G dialout $USERUSB
允許 jtag 裝置使用 USB。
cat > $HOME/rule.tmp <<_EOF
# All 3D Robotics (includes PX4) devices
SUBSYSTEM=="usb", ATTR{idVendor}=="26AC", GROUP="plugdev"
# FTDI (and Black Magic Probe) Devices
SUBSYSTEM=="usb", ATTR{idVendor}=="0483", GROUP="plugdev"
# Olimex Devices
SUBSYSTEM=="usb",  ATTR{idVendor}=="15ba", GROUP="plugdev"
_EOF
sudo mv $HOME/rule.tmp /etc/udev/rules.d/10-px4.rules
sudo /etc/init.d/udev restart
plugdev
sudo usermod -a -G plugdev $USER開始編譯
編譯錢請先確定目錄是在Fireware下
pwd
/tmp/Fireware
開始編譯吧! 這次目標是要編譯 stm32f4-discovery 這塊版子。
make px4-stm32f4discovery_default編譯結束後會像這個樣子
[100%] Creating /tmp/Firmware/build/nuttx_px4-stm32f4discovery_default/px4-stm32f4discovery_default.px4
[100%] Built target px4
燒錄到板子上
make px4-stm32f4discovery_default upload參考資料
-
ubuntu 安裝 virt-manager 虛擬機器管理工具
其實去年已經搞定了這個東西 因為太懶惰一直沒有寫筆記, 最近突然想起來找個小空檔寫了一下筆記
環境
首先當然是要介紹一下主角 virt-manager 圖形化虛擬機器管理工具, virt-manager 可以支援Qemu虛擬機器
首先介紹一下 virt-manager 後面的 虛擬機器工具 Qemu, 這是一款支援多平台的虛擬機器, 支援x86, arm等架構的CPU, 再這之前要看一下是本地端的CPU有沒有支援虛擬化的模組
因此這裡只有寫Intel的CPU
- 看一下是否有支援, 如果沒有資料表示你的CPU可能不支援這個功能
$ cat /proc/cpuinfo | grep vmx flags : vmx (前後都省略了, 有vmx才是重點) - 檢查一下kvm模組有沒有被載入, 而kvm_intel是intel的kvm模組
 $ lsmod | grep kvm
 kvm_intel             172032  0
 kvm                   544768  1 kvm_intel
 irqbypass              16384  1 kvm
最後就是講我的host OS了
- Host OS: ubuntu-mate 16.04 Lts 64bit
再來是CPU要看有沒有
安裝
根據 virt-manager 指引可以透過發行版的套件管理工具安裝
#yum install virt-manager(Fedora)
#apt-get install virt-manager(Debian)
#emerge virt-manager(Gentoo)
#pkg_add virt-manager(OpenBSD)
我選擇直接下載程式碼進行安裝, 當前版本(2018.01.12)是
1.4.3一, 下載程式碼
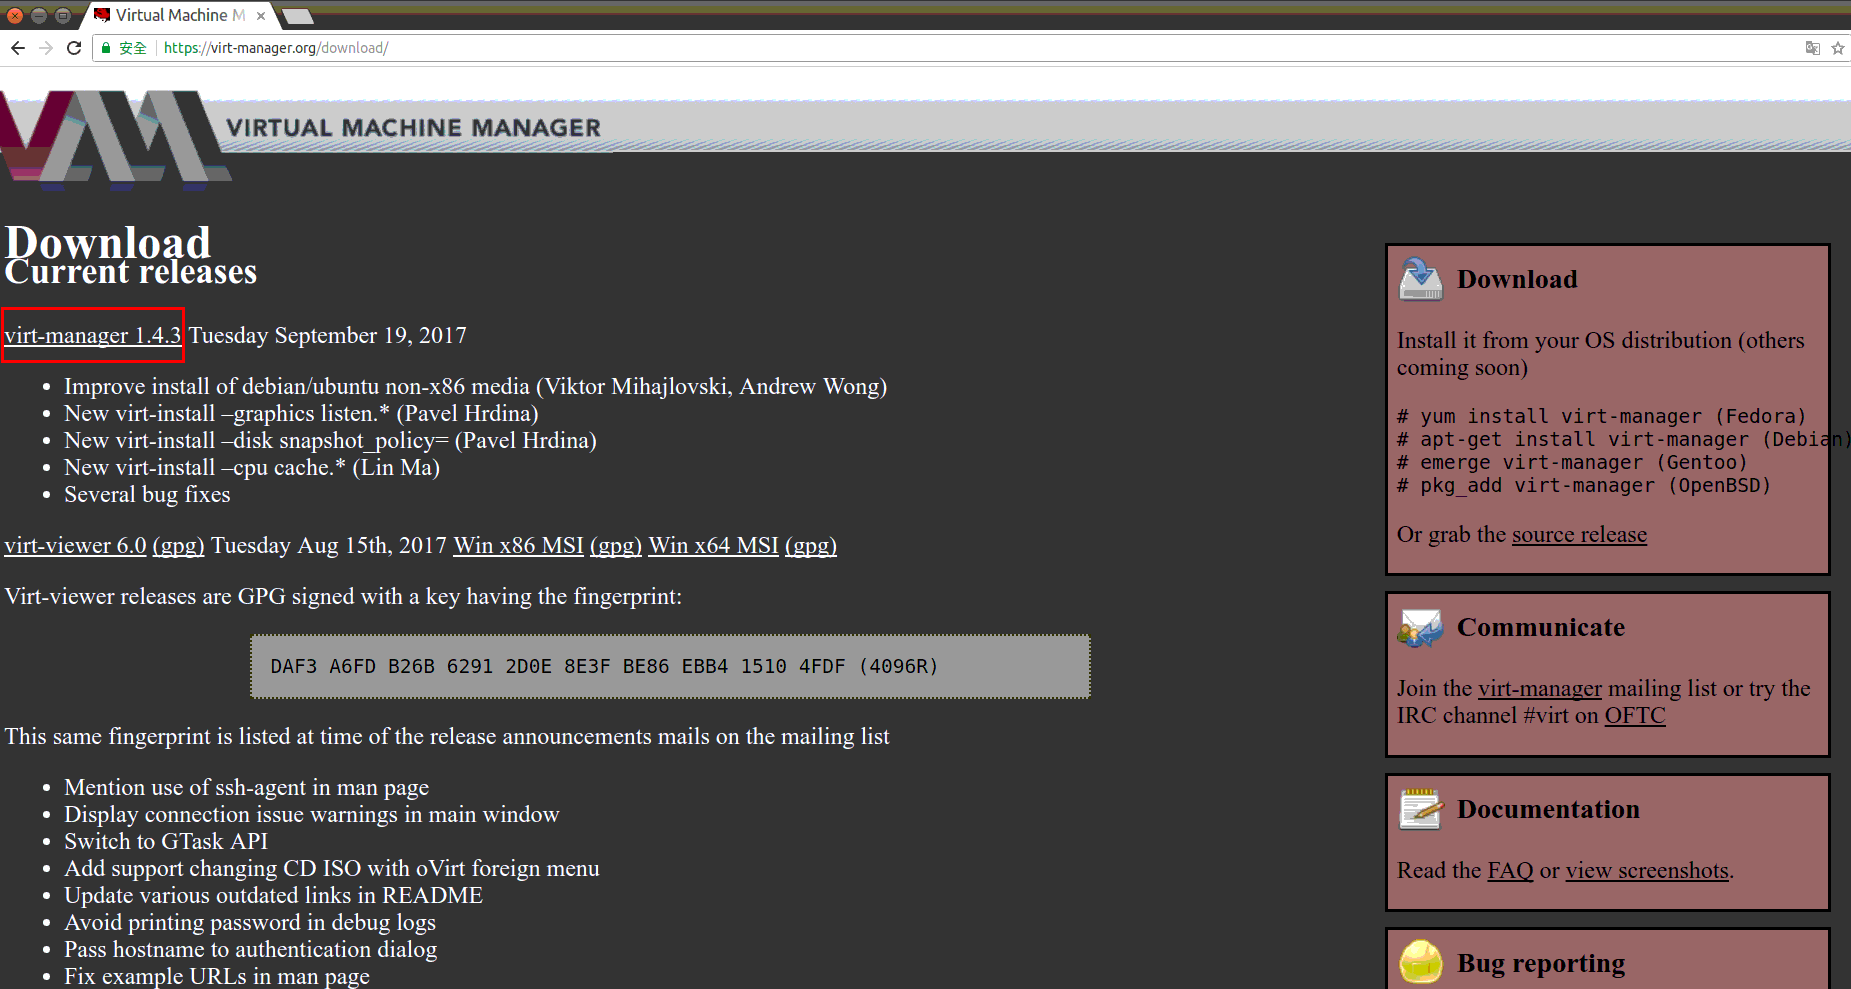
- virt-manager 官方下載頁
- 下載點位置在左上角, 紅色框框的位置
- 保險起見可以使用gpg去檢查一下下載的檔案是否有問題
- 下載點位置在左上角, 紅色框框的位置
- git clone 連結
$ git clone https://github.com/virt-manager/virt-manager.git
二, 安裝相關套件
$ sudo apt-get install qemu
$ sudo apt-get install libvirt-bin
$ sudo apt-get install ubuntu-vm-builder
$ sudo apt-get install bridge-utils
三, 編譯程式
-
解壓縮原始碼
$ tar xfav virt-manager-1.4.3.tar.gz $ cd virt-manager-1.4.3/ -
編譯
$ ./setup.py build -
安裝到系統中, 記得要使用 super user 權限
$ sudo ./setup.py install
使用
-
觀看版本號碼
$ virt-manager --version 1.4.3 -
啟動virt-manager
$ virt-manger # 這樣就可以啟動了
後記
這次安裝的時候發生virt-manager運作的時候虛擬機器視窗無法正常顯示機器的畫面也無法建立新的虛擬機器這種奇怪的狀況, 爬了外國的文章發現可以嘗試將qemu也升級到最新版本, 並且重新安裝virt-manager, 這個問題被解決了
- 看一下是否有支援, 如果沒有資料表示你的CPU可能不支援這個功能
-
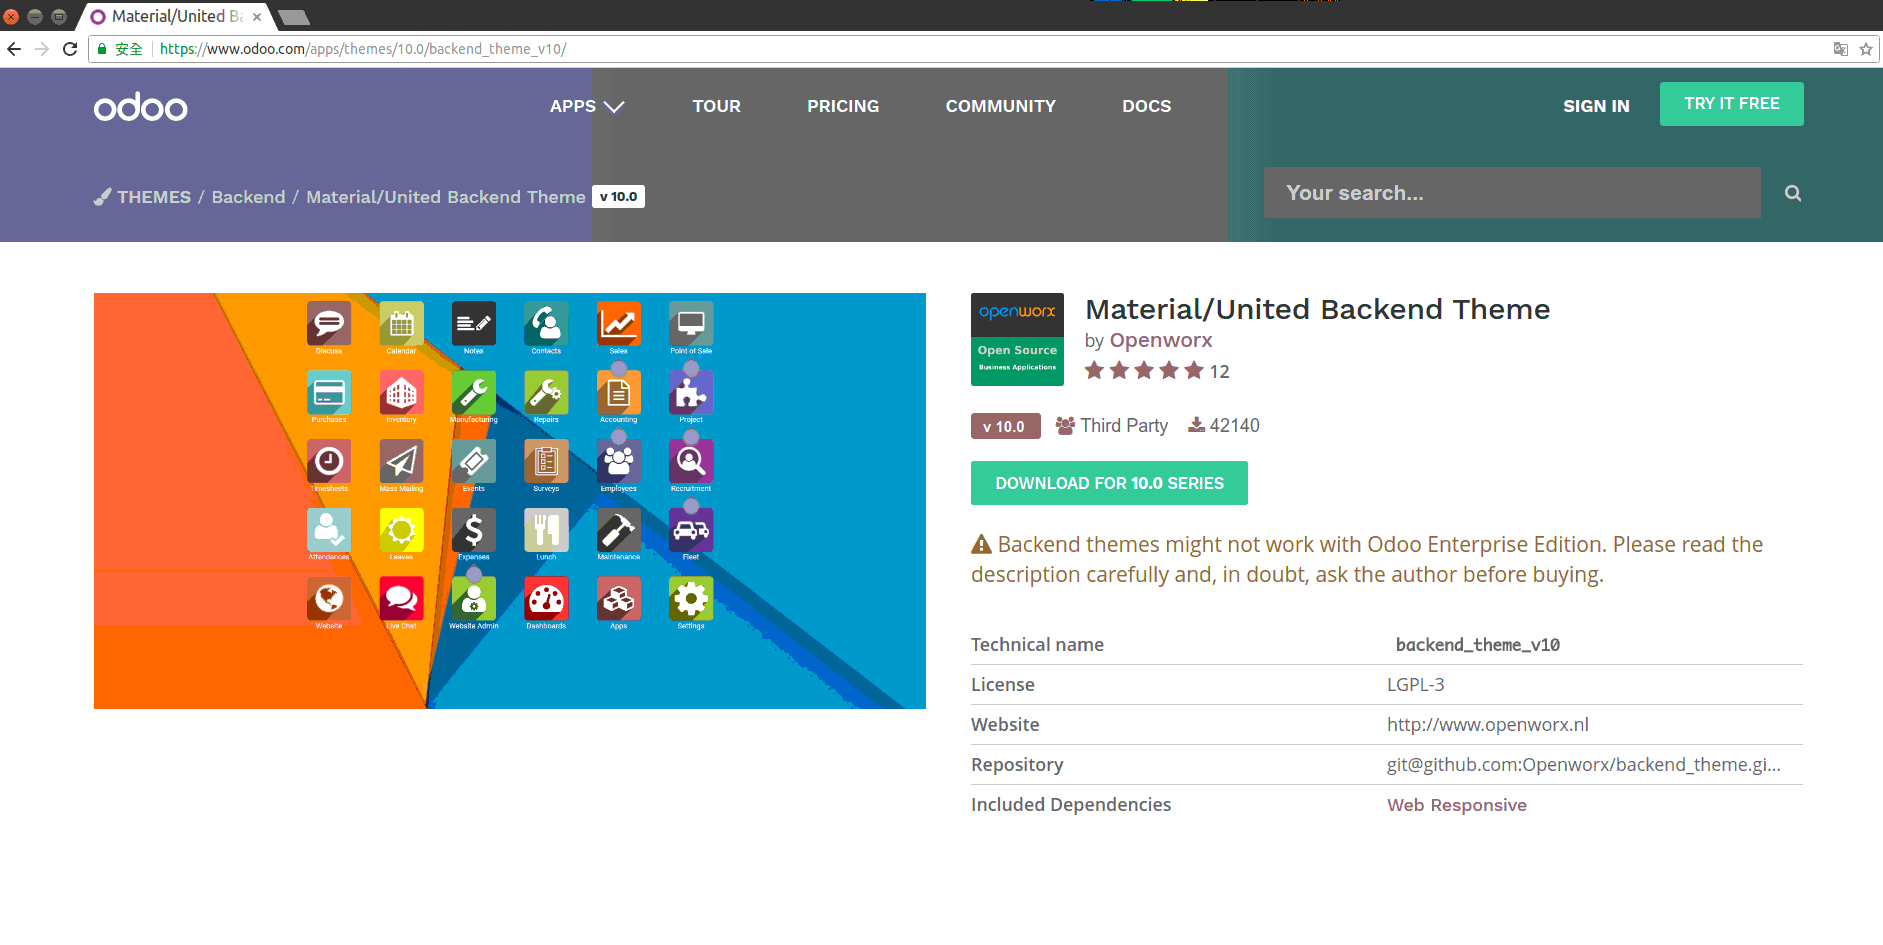
Odoo change theme
這次搞的就是改變ERP操作介面的外觀了, 在Odoo的網站上有不少介面是不錯看的, 這篇我使用的是Material/United Backend Theme by Openworx, 這是由一家荷蘭Odoo廠商提供的版型, 但請注意這個版本只支援社群版
安裝
-
下載後將檔案解壓縮放入資料夾中
- 資料夾位置: /usr/lib/python2.7/site-packages/odoo/addons
$ unzip backend_theme_v10-10.0.1.0.23.zip- 解開後會有2個資料夾, 搬過去就可以了
- web_responsive/
- backend_theme_v10/
$ mv web_responsive /usr/lib/python2.7/site-packages/odoo/addons/. $ mv backend_theme_v10 /usr/lib/python2.7/site-packages/odoo/addons/. -
開啟odoo後台, 安裝版型
- setting
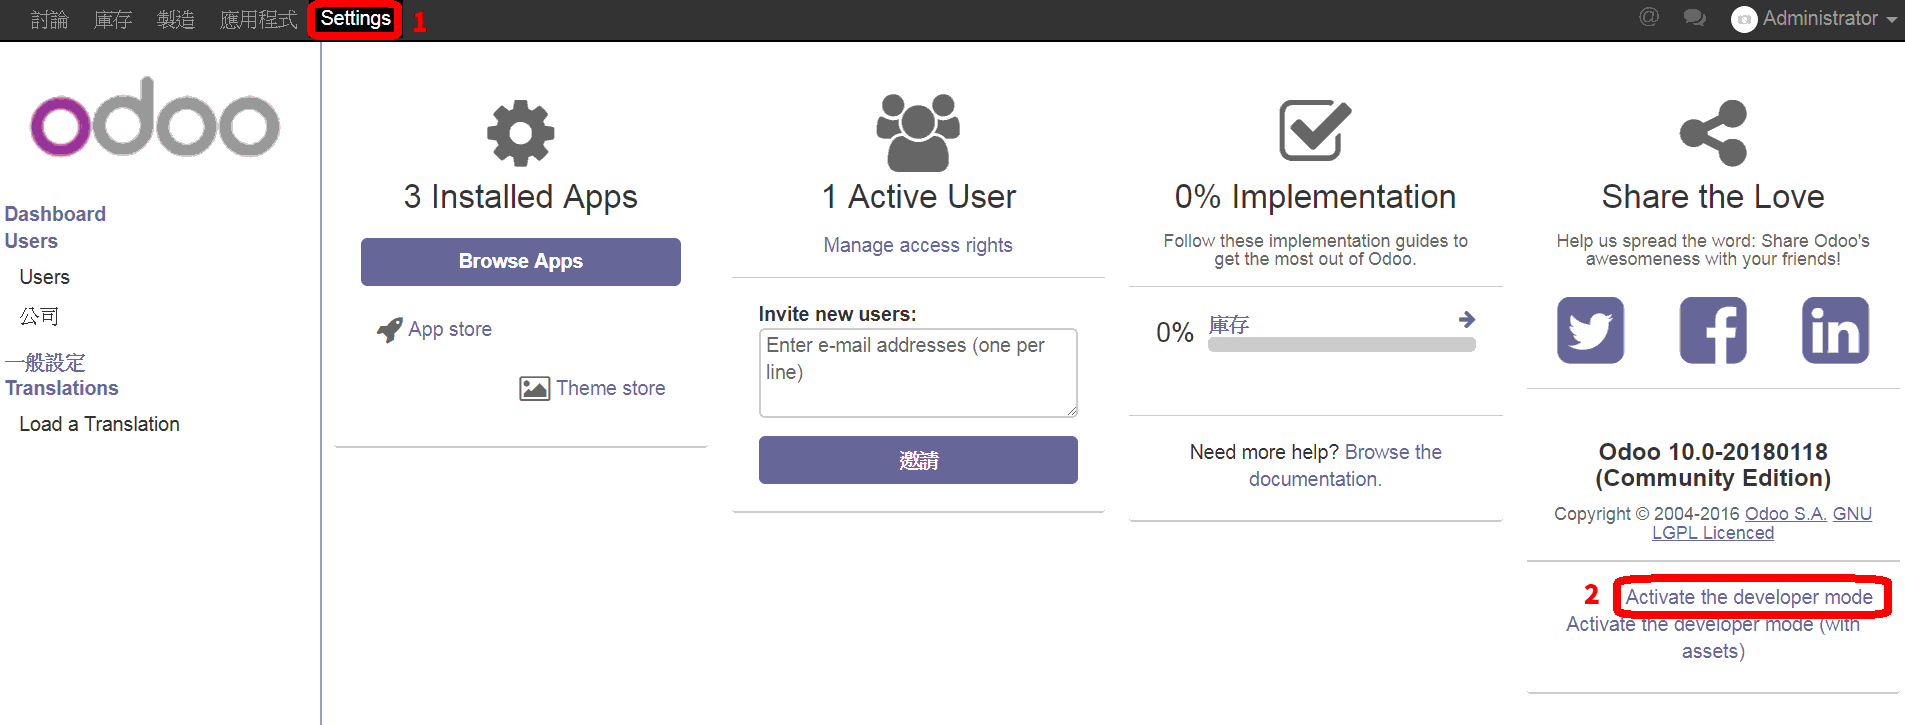
- Update Apps List
當設完setting之後, 要更新應用程式表, 讓系統讀取到最新的資料
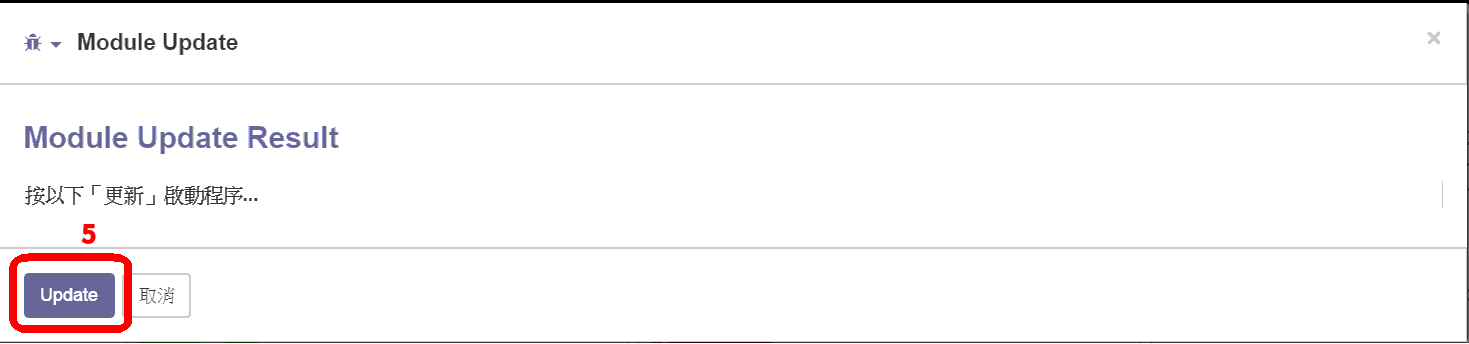
- 點下應用程式(Application)
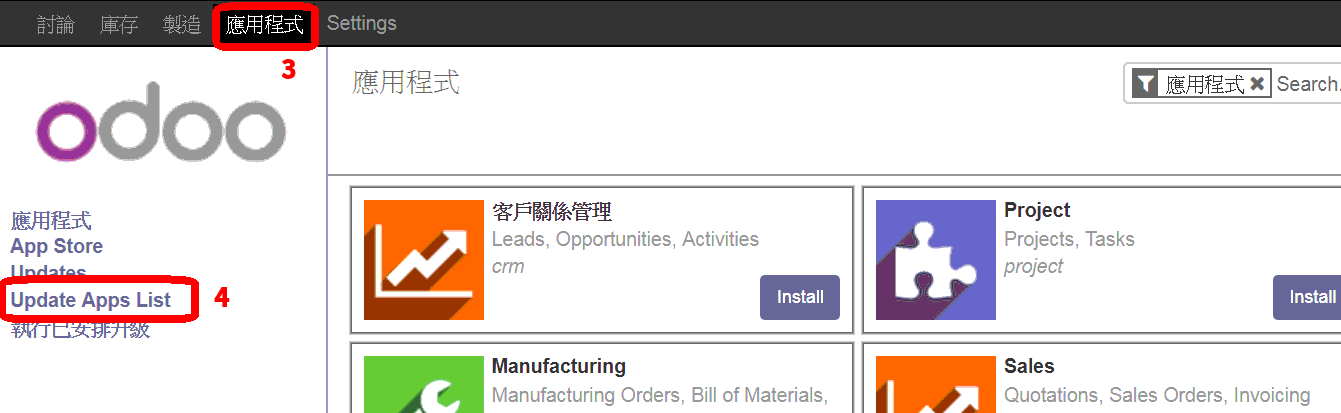
- 選擇Update即可更新
- 點下應用程式(Application)
- 搜尋 theme, 關鍵字
theme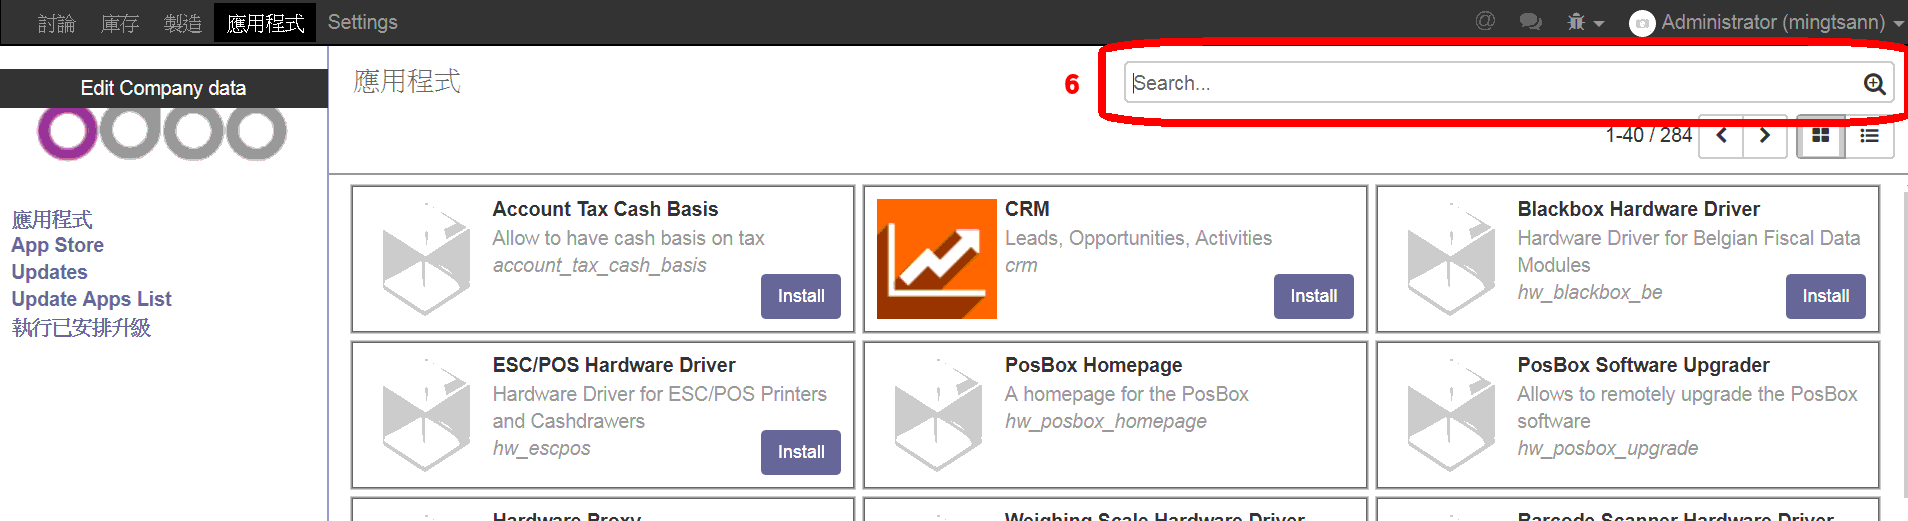
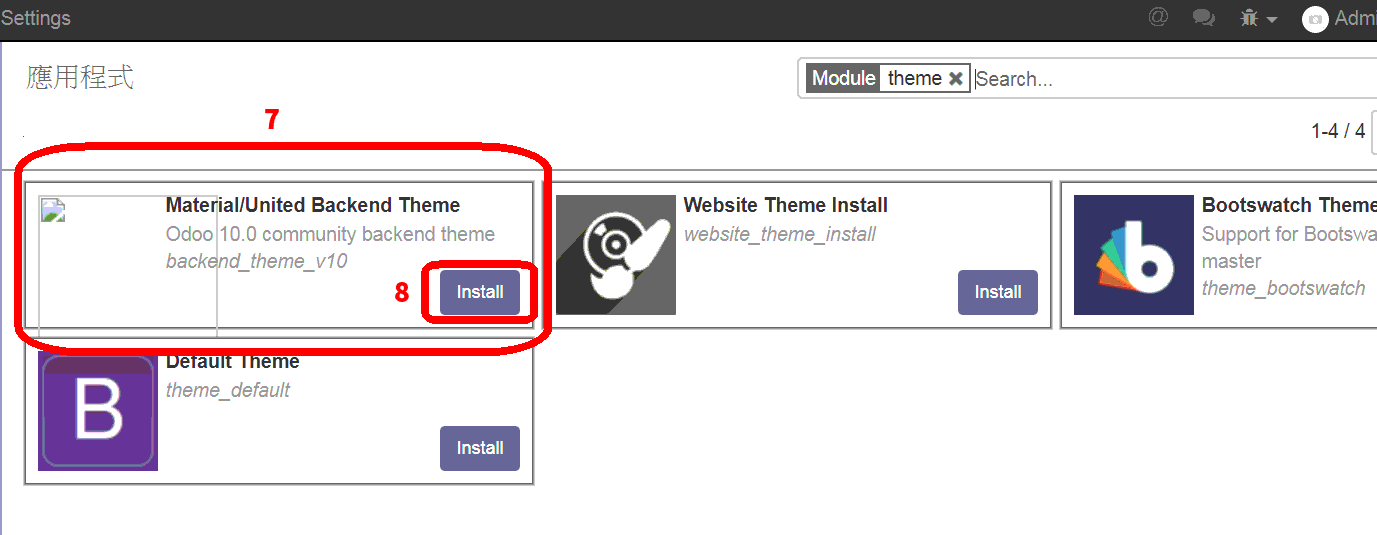
- 找到Material/United Backend Theme, 安裝即可
- setting
-
-
Centos 7 install Odoo
Odoo 是一款開放原始碼的ERP, ERP全名是Enterprise Resource Planning企業資源計劃, 有名的付費ERP有Oracle / SAP / 在台灣比較有名的則是有鼎新等等… Open Souerce的ERP除了Odoo之外還有ERPnext / iDempiere / Dolibarr ERP等等…
本篇的Odoo版本為10, 作業系統為centos 7
安裝套件
odoo採用的資料庫為PostgreSQL, 先裝起來然後啟動吧
# 安裝postresql
$ sudo yum install -y postgresql-server

# 初始化postgresql
$ sudo postgresql-setup initdb

# 啟動postgresql
$ sudo systemctl enable postgresql
$ sudo systemctl start postgresql
接下來就是安裝odoo了, 由於odoo(寫此筆記時)並不在centos的repo中, 所以要先加入repo才能使用yum安裝
$ sudo yum install epel-release
$ sudo yum install yum-utils

# 加入odoo的repo
$ sudo yum-config-manager --add-repo=https://nightly.odoo.com/10.0/nightly/rpm/odoo.repo

# 安裝odoo
$ sudo yum install -y odoo

# 啟動odoo
$ sudo systemctl enable odoo
$ sudo systemctl start odoo
連線到 ERP
Odoo預設的port是8069, 開啟瀏覽器 localhost:8069就可以看到了, 當然如果是外部的機器要連入則是需要允許8069通過防火牆
$ sudo firewall-cmd --perement --add-port=8069/tcp
$ sudo firewall-cmd --reload
設定完之後就可以讓用外部電腦連線到 [your erp ip]:8069 看看了
-
debian dns server 架設
這篇筆記使用 sudo 表示使用
super user權限, 如果您沒有開通sudo這個指令, 請直接切換成root即可安裝套件
dns伺服器的套件是
bind9# 請使用 super user 權限 $ sudo apt-get install bind9假設安裝系統時使用最小安裝, 可能不會有
nslookup這個指令安裝指令如下
# 請使用 super user 權限
$ sudo apt-get install dnsutils
環境
-
IP網域: 192.168.0.1 ~ 192.168.0.255
-
子網路遮罩: 255.255.255.0
-
Gateway: 192.168.0.1
- 網域url: example.com
- 此網域僅用於虛擬機器測試 如有重複請見諒
- 網域中的裝置 | 裝置名稱 | IP | 用途 | | ——- | — | — | | gateway | 192.168.0.1 | 對外網路 | | dns | 192.168.0.254 | 名稱伺服器 | | nas | 192.168.0.253 | 網路硬碟 | | server 1 | 192.168.0.10 | 伺服器1 | | server 2 | 192.168.0.11 | 伺服器2 | | desktop 1 | 192.168.0.50 | 電腦1 | | desktop 2 | 192.168.0.51 | 電腦2 |
正反解設定
Bind主要的檔案放在 /etc/bind 中比較重要的有3個檔案
- named.conf
- db.IP
- db.網域
named.conf 裡面 include 了 3 個檔案
- named.conf.options
- named.conf.local
- named.conf.default-zones
這次架 dns 我使用了 named.conf.local, 在這個檔案中定義網域與對應檔案
zone "example.com" {
    type master;
    file "/etc/bind/db.example.com";   # 正解資料對應檔案路徑
};

zone "0.168.192.in-addr.arpa" {
    type master;
    file "/etc/bind/db.0.168.192";  # 反解資料對應檔案路徑
};
注意1: IP要反過來寫
注意2: file名稱要和正反解檔案相同
正解檔案
這個檔案直接複製 db.local
$ cp db.local db.example.com根據範本填入IP資料
;
; BIND data file for local loopback interface
;
$TTL    604800
@       IN      SOA     localhost. root.localhost. (
                              2         ; Serial
                         604800         ; Refresh
                          86400         ; Retry
                        2419200         ; Expire
                         604800 )       ; Negative Cache TTL
;
@       IN      NS      example.com.
@       IN      A       192.168.0.254
dns     IN      A       192.168.0.254
web     IN      A       192.168.0.254
nas     IN      A       192.168.0.253
desktop2    IN      A       192.168.0.51
desktop1    IN      A       192.168.0.50
server2 IN      A       192.168.0.11
server1 IN      A       192.168.0.10
gateway IN      A       192.168.0.1
反解檔案
這個檔案直接複製 db.127
$ cp db.127 db.0.168.192根據範本填入IP資料
;
; BIND reverse data file for local loopback interface
;
$TTL    604800
@       IN      SOA     dns.example.com. root.dns.example.com. (
                              1         ; Serial
                         604800         ; Refresh
                          86400         ; Retry
                        2419200         ; Expire
                         604800 )       ; Negative Cache TTL
;
@       IN      NS      dns.example.com.
254     IN      PTR     web.example.com.
1       IN      PTR     gateway.example.com.
10      IN      PTR     server1.example.com.
11      IN      PTR     server2.example.com.
50      IN      PTR     desktop1.example.com.
51      IN      PTR     desktop2.example.com.
253     IN      PTR     nas.example.com.
啟動服務
目前比較常見的系統服務有2種
- system V
- system D
這裡只紀錄system D
# 請使用 super user 權限
$ sudo systemctl restart bind9
啟動之後來檢查一下狀態
# 這裡使用一般使用者即可即可
$ systemctl status bind9
# 以下省略
驗證
一旦設定完成可以開始驗證dns功能了
正查
$ nslookup dns.example.com

# 結果如下
Server:         192.168.0.254
Address:        192.168.0.254#53

Name:   dns.example.com
Address: 192.168.0.254
反查
$ nslookup 192.168.0.254

# 結果如下
Server:         192.168.0.254
Address:        192.168.0.254#53

254.0.168.192.in-addr.arpa       name = dns.example.com.
254.0.168.192.in-addr.arpa       name = web.example.com.
後記
- 要允許dns通過防火牆, 否則只有dns自己可以用這個服務
- 網域IP順序問題, named.conf.local的zone網域一定要寫對, 不然會讀不到東西
參考資料
-