Welcome to yuhao's Blog!
在探索的路上留下最美好的記憶-
VirtualBox 橋接網路介面
VirtualBox 網路模式整體來分有4種
- NAT
- 橋接介面卡
- 內部網路
- 未附加
而NAT可對外部網路連線, 但對本機則需要透過port轉送的設定才可以完成連線, 內部網路和未附加則是無法對外部網路連線
橋接網路介面概念
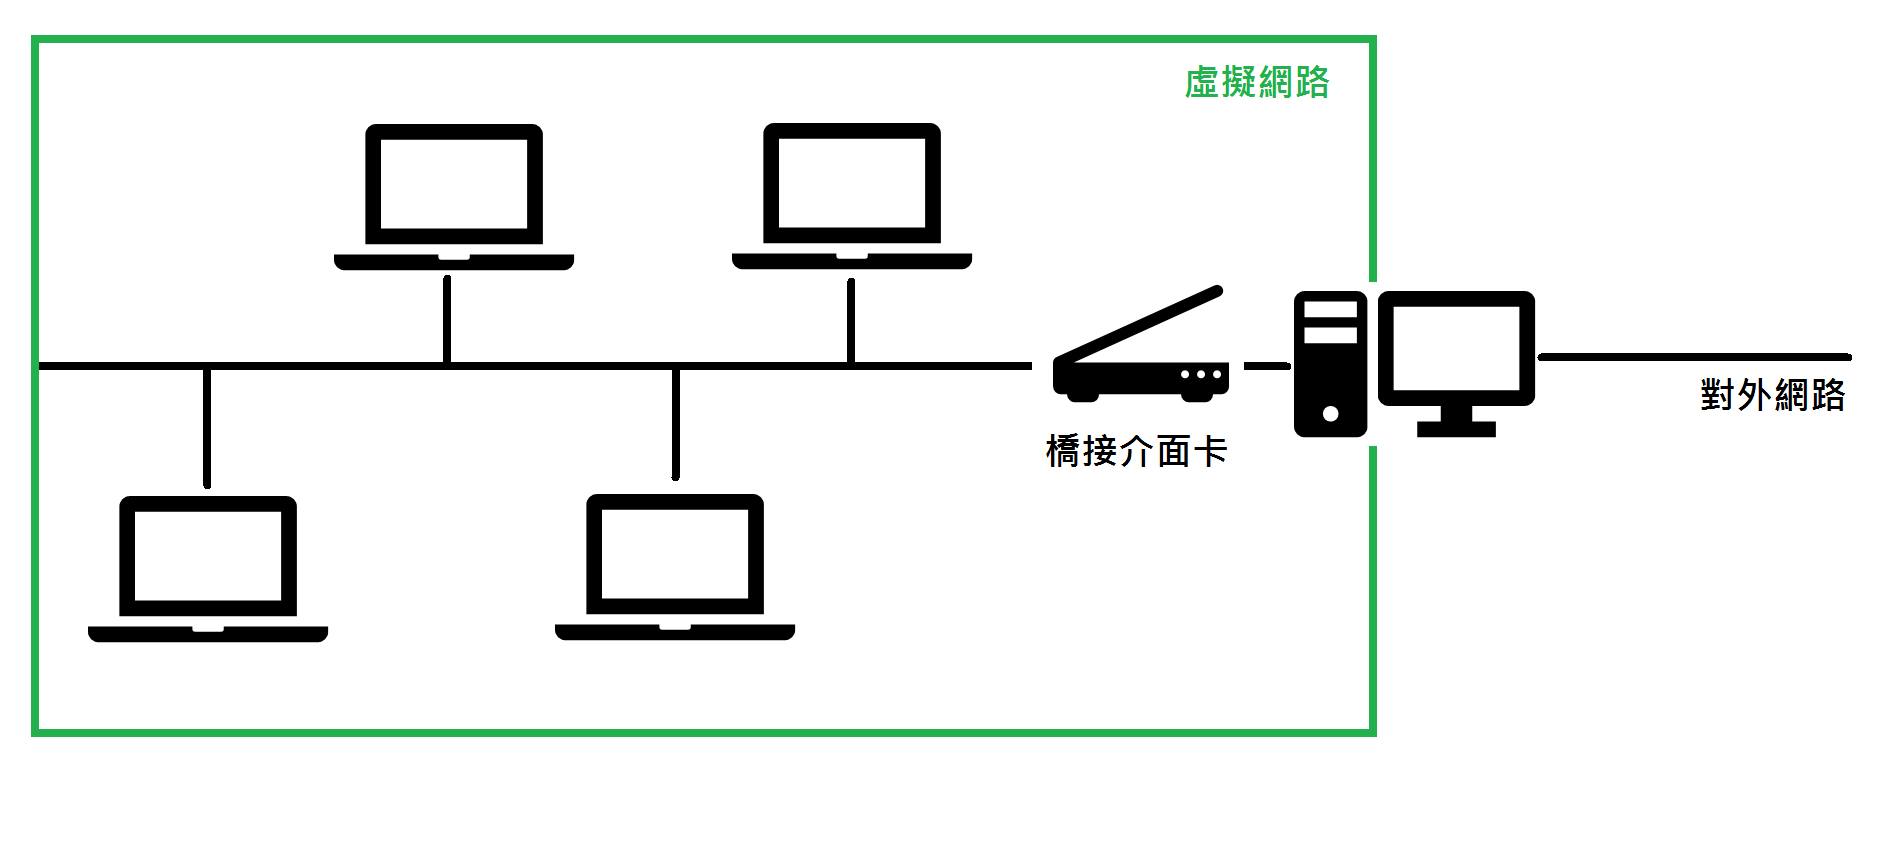
在實體主機產生一張橋接介面網路卡, 讓虛擬機器經由這個網卡連接上外部網路
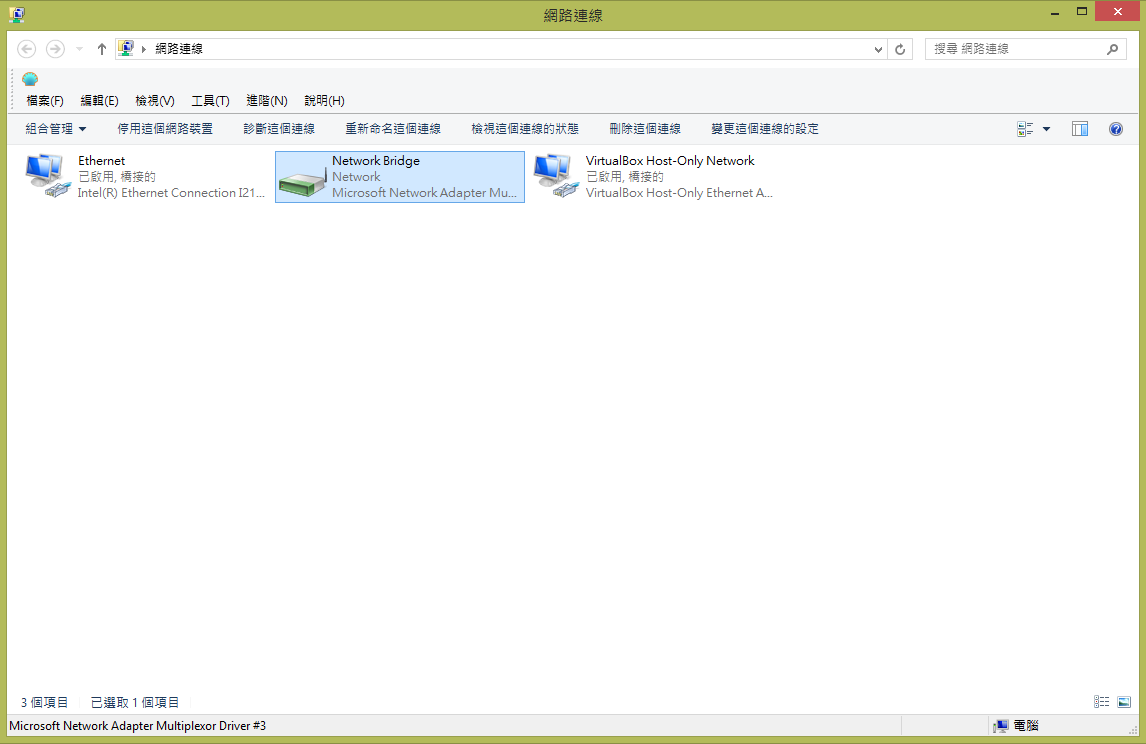
產生橋接介面
windows
- 開啟網路連線
- 選擇要加入橋接介面的網卡
筆記
- 新增網卡
- 點選要加入的網卡
- [右鍵] 橋接器連線
- 移除網卡
- 點選要移除的網卡
- [右鍵] 從橋接器中移除
virtualbox設定
當已經建好橋接網路就可以開始進行虛擬機器的設定了,
設定值 -> 網路 -> 啟用網路卡 -> [附加到]網路介面卡

PS. 當名稱的欄位是未選取表示bridge沒有設定成功!!
挫折紀錄
- windows下 橋接介面卡無法弄得像Linux bridge那樣可以隨意更改橋接介面的網域
- 解決方法: 網域使用區域網網段, 可以順利連上網路
!!! 但我認為應該還有其他方法可以解決這個問題 想到新的idea再來嘗試看看
- 解決方法: 網域使用區域網網段, 可以順利連上網路
- 虛擬機器網路設定完成, 可以ping通各個區域網的電腦, 但無法連線到外部網路
- 解決方法: 一時沒察覺在這個網域對外還有一台route, 請網管放行虛擬網卡mac碼就可以順利通行了
參考資料
-
make 筆記
這陣子程式量偏多又苦於沒有硬體和Debugger工具可以測試軟體的安全性, 想起過去看到成大資工系的piko-rt專案使用make做build時可以順便做測試, 覺得這個方法很不錯所以特地撥空寫了這個筆記文
格式
Makefile格式是由目標(target),相依檔案(filename),和規則(rule)組成, 必須注意規則前面的空白是
tab# <target>: <filename> # <rule> all: main.c gcc main.c -o main.omacro
當專案的檔案非常多的時候, 檔案的相依性會變得非常多打起來非常麻煩, 使用macro可以更方便的修改資料, 還有一些參數設定等等功能
# 宣告
變數名稱 = 變數資料

# 呼叫
$(變數名稱)
還有一個不錯的功能, 假設有個.c檔案編譯之後會產生一個.o檔案, 這時候可以用這個方法直接幫macro宣告過的檔案全部換副檔名
SOURCE = aa.c bb.c cc.c
OBJECT = $(SOURCE:.c=.o)
# 這時候 $(OBJECT) 就是 aa.o bb.o cc.o 了
特殊符號
符號 功能 $< 屬於第一個相依項目 $@ 當前目標相依項目 $<
屬於第一個相依的項目
test: main.c main.h
    gcc -c $<
則編譯時會變成
gcc -c main.c$@
當前目標相依項目
test: main.c main.h
    gcc -c $< -o $@
則編譯時期會變成
    gcc -c main.c -o test.exe   # windows mingw32
    gcc -c main.c -o test       # Linux gcc
參考來源
-
STM32F4 USB Bootloader燒錄 on Linux
兩三個月前寫了一篇windows的燒錄筆記(Link), 最近有空也把linux上的dfu燒錄方法做一下紀錄
安裝套件
我使用的 Linux 發行版是 ubuntu , 這個燒錄的套件是
dfu-utilsudo apt-get install dfu-util
燒錄STM32
STM32進入DFU模式
- 將版子模式扳到boot
- 插上usb供電
檢查一下usb狀態
為了確保stm32的usb正常運作, 可以透過
lsusb來檢查usb運作的狀態lsusb看到 [STMicroelectronics STM Device in DFU Mode] 表示進入DFU模式了, 成功之後可以進行下一個動作了
Bus 001 Device 013: ID 0483:df11 STMicroelectronics STM Device in DFU Mode備註: 我插在 USB3.0 的 Port 時常常會斷線, 後來改用 USB2.0 的 Port 就沒問題了
燒錄
dfu-util 支援
.bin和.dfu的燒錄燒錄資訊
- file: stm32_demo.bin
- usb ID: 0483:df11
- power: usb
sudo dfu-util -d 0483:df11 -a 0 -s 0x08000000 -D stm32_demo.bin
上面做的事情
user@ubuntu:~$ sudo apt-get install dfu-util
[sudo] password for user:
... 省略 ...
user@ubuntu:~$ cd stm32_demo/
user@ubuntu:~/stm32_demo$ ls
stm32_demo.bin                 # 其他檔案省略
user@ubuntu:~/stm32_demo$ lsusb
Bus 001 Device 013: ID 0483:df11 STMicroelectronics STM Device in DFU Mode
... 省略 ...
user@ubuntu:~/stm32_demo$ sudo dfu-util -d 0483:df11 -a 0 -s 0x08000000 -D stm32_demo.bin
dfu-util 0.8

Copyright 2005-2009 Weston Schmidt, Harald Welte and OpenMoko Inc.
Copyright 2010-2014 Tormod Volden and Stefan Schmidt
This program is Free Software and has ABSOLUTELY NO WARRANTY
Please report bugs to dfu-util@lists.gnumonks.org

dfu-util: Invalid DFU suffix signature
dfu-util: A valid DFU suffix will be required in a future dfu-util release!!!
Opening DFU capable USB device...
ID 0483:df11
Run-time device DFU version 011a
Claiming USB DFU Interface...
Setting Alternate Setting #0 ...
Determining device status: state = dfuERROR, status = 10
dfuERROR, clearing status
Determining device status: state = dfuIDLE, status = 0
dfuIDLE, continuing
DFU mode device DFU version 011a
Device returned transfer size 2048
DfuSe interface name: "Internal Flash  "
Downloading to address = 0x08000000, size = 4696
Download	[=========================] 100%         4696 bytes
Download done.
File downloaded successfully

# 完成!
資料來源
https://wiki.bitcraze.io/projects:crazyflie2:development:dfu
-
Git 追蹤與提交
Git 版本控制 可以紀錄每個提交, 過去沒接觸到版本控制之前只用壓縮檔案備份檔案常常發現一些問題, 除了無法得知某個壓縮檔當時備份時修改過甚麼, 還有檔案多人共用的時候回復檔案後也常常發現資料有衝突不知道哪個檔案最終版本是甚麼, 發現版本控制之後可以解決這些問題, 不只可以多人共同工作每個提交(備份)都會有一筆紀錄, 發現程式檔案毀掉的時候可以用以前提交的紀錄來進行資料回復
Git 加入追蹤
檔案修改後將加入暫存區, 作法有2種
-
加入這個目錄下的所有被變更的檔案
git add . -
加入指定檔案
git add <file_name>
Git 提交紀錄
工作告一段落之後提交一個紀錄, 這個提交只會紀錄有被追蹤的檔案
-
-
Command Line 檔案操作
使用Command Line來操作系統中的檔案
開始之前, 必須先了解位置表示法中的幾個符號的意義
符號 意義 / 根目錄 . 當前目錄 .. 上一層目錄 ~ 家目錄 - 根目錄
/- 檔案系統的最上層稱為根目錄, 所有的目錄樹都是由根目錄開始的
- 當前目錄
.- 現在所在位置的目錄, 這個筆記稱為當前目錄, 也就是現在所在的目錄
- 上一層目錄
..- 現在位置的上一層目錄, 如果你的當前目錄是根目錄的話, 上一層目錄依然是根目錄
- 家目錄
~- 每個使用者個家目錄, 這個目錄使用
~表示, 因此再不同的使用者~位置都不一樣, 大部份的使用者家目錄都位於/home中, 但root就是個例外root的家目錄是/root
- 每個使用者個家目錄, 這個目錄使用
絕對路徑和相對路徑的差異
- 絕對路徑都是由根目錄開始的, 表示開頭都是
/ - 相對路徑由現在位置開始, 舉例來說開頭有
.,..或~就是相對路徑
檔案查詢
1.
ls顯示出目錄中的所有檔案user@server:~$ ls Desktop Documents Downloads Music Pictures Public Templates Videos當要找出隱藏檔案時可以加入參數 a
user@server:~$ ls -a
.  ..  .ssh  Desktop  Documents  Downloads  Music  Pictures  Public  Templates  Videos
想要將所有目錄樹顯示可以加入參數 R
user@server:~$ ls -R
.:
Desktop  Documents  Downloads  Music  Pictures  Public  Templates  Videos

./Desktop

./Documents
books.pdf  mydoc.odf

./Downloads

./Music
music.mp3

./Pictures

./Public

./Templates

./Videos
vedio.mp4
目錄操作
1.
pwd查詢現在所在目錄查詢所在目錄的指令是
pwd, 這個指令會完整的顯示出目前所在位置的絕對路徑user@server:~$ pwd /home/user # 這邊顯示出我們正在user這個目錄中2.
cd切換目錄切換目錄的指令是
cd, 這個指令可以為我們切換到我們要求的地方- 使用絕對路經切換目錄, 範例: 切換到/tmp目錄
user@server:~$ pwd /home/user # 現在位置是user的家目錄 user@server:~$ cd /tmp # 切換到/tmp user@server:/tmp$ pwd /tmp # 成功切換到/tmp- 使用相對路徑切換目錄
- 範例1: 使用相對路徑切換到上一層
user@server:~$ pwd /home/user # 現在位置 user@server:~$ cd .. # 切換到上一層目錄 user@server:/home$ pwd /home # 現在位置/home- 範例2: 使用
~切換回家目錄
user@server:/home$ pwd
/home                   # 現在位置
user@server:/homr$ cd ~ # 切換到上一層目錄
user@server:~$ pwd
/home/user              # 現在位置/home
3.
mkdir建立目錄user@server:~$ ls Desktop Documents Downloads Music Pictures Public Templates Videos user@server:~$ mkdir newdir newdir Desktop Documents Downloads Music Pictures Public Templates Videos
檔案/目錄操作
1.
touch建立一個空白檔案檔案不存在時使用
touch會建立一個檔案user@server:~$ ls Desktop Documents Downloads Music Pictures Public Templates Videos user@server:~$ touch abc.txt user@server:~$ ls abc.txt Desktop Documents Downloads Music Pictures Public Templates Videos2.
mv移動檔案/目錄mv 可以用來搬移檔案或搬移目錄, 搬移時可以指定新的名字或是使用
.來沿用舊名mv <移動的檔案> <新位置or新名字>- 範例1: 將abc.txt搬移到/tmp中
user@server:~$ ls abc.txt Desktop Documents Downloads Music Pictures Public Templates Videos user@server:~$ mv abc.txt /tmp/. user@server:~$ ls Desktop Documents Downloads Music Pictures Public Templates Videos user@server:~$ cd /tmp user@server:/tmp$ pwd /tmp user@server:~$ ls abc.txt - 範例2: 將abc.txt搬移到/tmp並命名為aaa.txt
user@server:~$ ls
abc.txt  Desktop  Documents  Downloads  Music  Pictures  Public  Templates  Videos
user@server:~$ mv abc.txt /tmp/aaa.txt
user@server:~$ ls
Desktop  Documents  Downloads  Music  Pictures  Public  Templates  Videos
user@server:~$ cd /tmp
user@server:/tmp$ pwd
/tmp
user@server:~$ ls
aaa.txt
3.
cp複製檔案mv 複製時可以指定新的名字或是使用
.來沿用舊名, 但複製目錄的時候要加上參數Rcp <複製目標> <新檔案> cp -R <複製目標> <新檔案>- 範例1: 將abc.txt複製到/tmp中
user@server:~$ ls abc.txt Desktop Documents Downloads Music Pictures Public Templates Videos user@server:~$ cp abc.txt /tmp/. user@server:~$ ls abc.txt Desktop Documents Downloads Music Pictures Public Templates Videos user@server:~$ cd /tmp user@server:/tmp$ pwd /tmp user@server:~$ ls abc.txt - 範例2: 將abc.txt搬移到/tmp並改名為aaa.txt
user@server:~$ ls
abc.txt  Desktop  Documents  Downloads  Music  Pictures  Public  Templates  Videos
user@server:~$ mv abc.txt /tmp/aaa.txt
user@server:~$ ls
abc.txt  Desktop  Documents  Downloads  Music  Pictures  Public  Templates  Videos
user@server:~$ cd /tmp
user@server:/tmp$ pwd
/tmp
user@server:~$ ls
aaa.txt
- 根目錄
-
Git 安裝
Git 是現在很流行的版本控制系統, 2005年Linus Torvalds為了更方便的管理Linux Kernel 開發而設計出來的, 目前由Git團隊維護中
Git 安裝
# Debian/Ubuntu系列
root@server:~$ apt-get install git

# RedHat/Fedora系列
root@server:~$ yum install git-core
建立本地端儲存庫
當我們一個專案的目錄需要進行版本控制的時候可以使用
init指令來建立一個新的儲存庫,PS. 此範例使用的目錄是
~/projectuser@localhost:~/project$ git init下載遠端 Git 儲存庫
當我們要複製一個專案下來本地端進行修改時可以用clone這個指令
# 請將clone路徑改為您的路徑
user@server:~$ git https://github.com/yuhao-kuo/test.git
#                  ^^^^^^^^^^^ clone 路徑 ^^^^^^^^^^^^^^